

Instructional Design Tips For Demonstrative Training Videos
- Posted on May 28, 2024
Designing For Demonstration Videos
Do you need to teach people how to perform a complex task? Maybe they need to install or replace part of an appliance, or maybe they’re assembling your product. No matter what it is, the consequences if they don’t follow the steps correctly can be disappointing or even dangerous. Demonstrative training videos, or how-to videos, are an excellent way to teach new skills that can be hard to learn from written instructions alone. Multiple camera angles show viewers exactly what they need, and they can pause, rewind, and rewatch as many times as they want!
So, how do you create one? It all starts with a well-planned script! In this article, we’ll walk through an example to show you why a detailed script is so important, and more importantly, how to put one together. Let’s get started.
Tips To Design Demonstrative Training Videos And Mistakes To Avoid
Sarah has an exciting day ahead.
She and her team are creating a demonstration video on how to install tile flooring, and today is the day of the shoot!
They’ve spent several weeks preparing for this—hiring a reputable video production company, building a set, and flying in a professional installer for the demonstration. It’s a big production!
But Sarah’s enthusiasm quickly dwindles.
First, the brand manager, who did not read the script prior to the shoot, points out issues with the product descriptions and displays. They stop to revise the script. The shoot stops again when the production team is confused by the instructions in Sarah’s script. Then, another stakeholder says the tile-cutting method they’re showing isn’t DIY-friendly.
Sarah’s exciting day is becoming a nightmare.
She needs to revise the script on set, parts of the video need to be reshot, and due to all of the delays, an extra day is needed to finish the shoot. Worst of all, the project is now over budget.
How did this happen?
The Importance Of A Script
A script is essential for a video, but if you’re creating a demonstration video, you may not see the need for a detailed script. You’re just following the steps, right?
But as we saw in Sarah’s example, sometimes crucial information is missed or unclear when the methods and tools used aren’t appropriate for the audience, even if the process was followed correctly. Not to mention a professional video shoot can be expensive! Hiring a production team, actors, and professional installers; ordering tools, set pieces, and company-branded clothing; paying for meals, gas, and hotels if travel is required—it all adds up.
Meticulous planning and scriptwriting will save you time, money, effort, and frustration. Let’s rewind and show you what Sarah could have done to avoid these issues on set.
Learn The Process
Sarah’s first mistake was not learning the process for the intended audience. The process and tools that her script called for were not wrong, but they weren’t geared toward a DIY audience.
When creating a demonstration video, learn the process and try to see it from your learners’ perspective. If you’re creating a video on how to install tile floors, then you need to know what that process looks like from start to finish, including what tools are used. Ideally, someone will walk you through each step while you take notes and capture photos or video clips for reference. If that’s not possible, ask a Subject Matter Expert (SME) to write down the steps for you or provide an instruction manual with pictures.
Review whatever materials you have and take notes. Can you complete each step using the information provided? What questions do you have about the process? If you’re writing for an inexperienced audience, the questions you have are likely the same ones they would have. On the other hand, if your audience is made up of professionals, then you need to determine which parts can be glossed over or eliminated and which ones need to be explained fully.
In addition to asking questions to identify the steps, meet with your SMEs and ask questions like:
- What does the audience already know? Have they done this before?
- Is there something new or unique about the process you’re demonstrating? What is it, and how is it different from the old or standard process?
- What tools does the audience need? Will they know how to use them?
- Which parts of the process give learners the most trouble?
- What jargon or terminology needs to be explained?
- Why are you creating this video? Does this information exist somewhere else? What is unique about your video?
Your SME’s answers will give you valuable background information about the audience and purpose of the video.
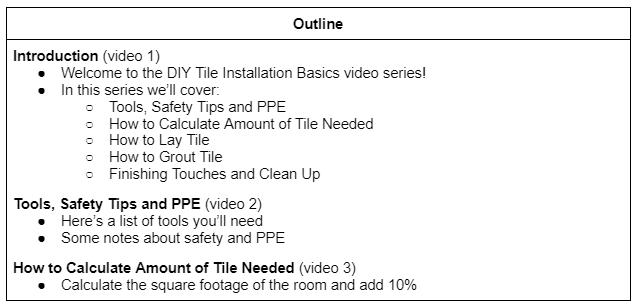
Create An Outline
Once you know who you’re writing for, the level of detail they need, and the process they need to follow, create an outline with the major steps in the process. If you’re not sure where to start, look at your learning objectives. What are the key points your video needs to address? Then, focus on the overall organization and flow of information, ignoring sub-steps and details for now.
If the process you’re demonstrating can be covered briefly, one finished video may be all you need. However, if your process is long, consider dividing your video into smaller, easy-to-digest videos that focus on one or two objectives.
Think about how learners will experience the video(s):
- Will the video(s) be uploaded as standalone objects on an LMS, YouTube, or your company’s intranet?
- Do you need to assign the video(s) to specific learners and track their views?
- Will the video(s) be part of a blended learning curriculum? How will the video(s) appear in relation to the other learning activities (quizzes, eLearning slides, in-person dialogue)?
- If you have multiple processes to cover, will you create a series of short videos or group them into one or two longer videos?
These questions are important because they will determine how each video begins and ends and how the transitions between videos and other learning content are handled.
Write The Script
Another issue Sarah encountered was that the production crew didn’t understand some of the instructions in her script. Video scripts typically follow a standard format and include directions for the cameraperson, the video editor, and the talent (the person on camera).
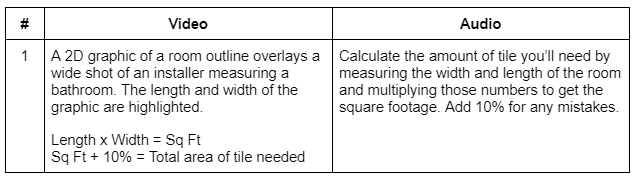
To write your script, start by creating a three-column table like the one shown here.

Copy each step from your outline and paste it into its own row in the audio column of your table. Expand your outline by adding the sub-steps and details. Then, turn the points of your outline into full sentences. As you’re writing, try to keep your sentences short and use active voice whenever possible. And, read your sentences out loud to make sure they flow well and will not be difficult for the narrator to read.
Another thing to remember while you’re writing is: show, don’t tell. Whenever possible, show details instead of explaining them with a voice-over. For example, Sarah’s video needs to demonstrate how to mix grout, so she should include close-up shots of the grout being mixed and spread so viewers can see how thick or thin it is. This is much more useful and engaging than a verbal description of what the grout should look or feel like.
When all of the steps are written out, describe how you will show each step. Work with a videographer, if necessary. Do you need a wide shot to show a large space? Do you need a close-up of someone’s hands? What graphics do you need? There’s no need to fully describe what the person on camera will be doing since the narration already does this. Instead, write down what the main focus of the visual should be, notes for the cameraperson or editor, and describe any graphics.
Think About Timing
When your visuals and narration are written out, review both sections and try to hear and visualize it all together. You can estimate the length of your narration by dividing its word count by the rate of words per minute (wpm) you want:
- 120 wpm = slow
- 160 wpm = casual
- 200 wpm = fast
Based on these estimates, a script with 1000 words of narration would take 8.33 minutes to read at a slow pace, 6.25 minutes at a casual pace, and 5 minutes at a fast pace.
You may find that you have too much narration for a short video clip. For example, if it takes the narrator 30 seconds to describe an action that takes 15 seconds to complete, you’ll need to balance this. Try to trim your audio or find a way to draw out the visuals. On the other hand, if the action you’re showing takes several minutes to complete and you only have 30 seconds of narration, you’ll need to balance it by filling the time with background music, adding pauses to the narration to keep pace with the video, or editing the video so we only see part of the action.
Write sentences so that the narration follows the visuals. For example:
- Say: “Next, measure and mark the tile with a line. Then, use a tile cutter to cut the tile.”
- Instead of: “Next, cut the tile. Measure and mark the tile with a line, then use a tile cutter…”
If you would like to denote that the next major step is cutting the tile, you can also create a graphic to indicate this step before going into the sub-steps.
Review And Revise
Costly problems can arise when stakeholders, like Sarah’s brand manager, don’t carefully review the script.
Once the first draft is complete, send it to your SMEs for review. Reviewers should verify that all of the steps are correct and that the timing and flow of information are suitable for the audience. Encourage everyone to read the script out loud and picture the visuals. If there are steps that you’re still unsure about, discuss them with the SME.
At some point, the production team should also review the script. This is even more important if you will be working with a vendor. Make sure everyone understands what the script calls for and clarify any misunderstandings right away.
Plan for more than one review. Focus on big-picture issues during the first review cycle and then move on to smaller issues, like sentence structure and word choice, in the following reviews.
Make sure everyone understands the cost of revising the script during or after the video shoot. It’s much easier (and less expensive) to edit text than it is to change the setup of a video production or edit video.
Conclusion
Don’t make Sarah’s mistakes!
Set your team up for success by writing a detailed script for your demonstration video. Not only can you save time, money, and effort, you will also create a better learning experience for your viewers.
To recap:
- Learn the process you are demonstrating as thoroughly as possible.
- Create an outline with the key steps of the process.
- Write the script:
- Expand your outline with details and sub-steps.
- Use active voice to write the narration.
- Read your script aloud to check the flow.
- Show, don’t tell—use visuals whenever possible.
- Describe key actions, camera shots/angles, and graphics.
- Balance the timing of audio and visuals.
- Review and revise.
These steps will help you produce high-quality demonstration videos that are relevant and accessible to your learners.

Cinecraft Productions
Cinecraft works with some of the world’s most recognizable brands to improve employee performance through the creation of better custom learning solutions. Better Learning – Better Results.
Designing For Demonstration Videos Do you need to teach people how to perform a complex task? Maybe they need to install or replace part of an appliance, or maybe they’re assembling your product. No matter what it is, the consequences if they don’t follow the steps correctly can be disappointing or even dangerous. Demonstrative training…